
이것저것 잡동사니
[예제 코드] PyQt5을 사용한 조이스틱(Joystick) 클래스 본문
반응형
파이썬으로 게임을 만들면서 조이스틱을 구현할 필요가 있어 만들게 되었다. 마우스 왼쪽 버튼을 드래그함으로써 조이스틱을 조작할 수 있다. 마우스를 떼면 조이스틱이 원점으로 되돌아간다.
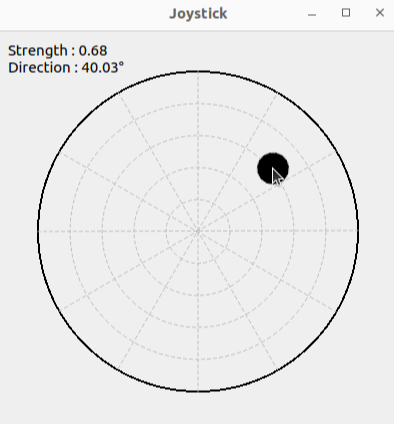
측정 값
1. 강도(Strength) : 0~1의 살수값을 가지며 조이스틱이 가운데에 있을 때 0, 가장자리에 있을 때 1이다.
2. 방향(Direction) : 오른쪽 방향을 0으로 하여 반시계방향으로 증가하도록 측정된다.
실행 결과
소스코드
깃헙 링크 : Github
본 포스트보다 깃헙의 코드가 더 최신코드입니다.
GitHub - bsiyoung/PyQt5-Joystick: Simple Joystick with PyQt5
Simple Joystick with PyQt5. Contribute to bsiyoung/PyQt5-Joystick development by creating an account on GitHub.
github.com
Joystick.py
import sys
import math

from PyQt5.QtWidgets import QApplication, QWidget
from PyQt5.QtWidgets import QLabel
from PyQt5.QtGui import QPainter, QBrush, QPen
from PyQt5.QtCore import Qt


class Joystick(QWidget):
    def __init__(self):
        super().__init__()

        self.window_title = 'Joystick'
        self.window_min_size = [200, 200]
        self.wnd_fit_size = 400
        self.window_size = [self.wnd_fit_size, self.wnd_fit_size]

        self.circle_margin_ratio = 0.1
        self.circle_diameter = int(self.window_size[0] * (1 - self.circle_margin_ratio * 2))

        self.stick_diameter_ratio = 0.1
        self.stick_diameter = int(self.circle_diameter * self.stick_diameter_ratio)
        self.is_mouse_down = False
        self.stick_pos = [0, 0]
        self.strength = 0

        self.stat_label_margin = 10
        self.stat_label = QLabel(self)

        self.init_ui()

    def init_ui(self):
        self.setWindowTitle(self.window_title)

        self.setMinimumSize(self.window_min_size[0], self.window_min_size[1])
        self.resize(self.window_size[0], self.window_size[1])

        self.stat_label.setAlignment(Qt.AlignLeft)
        self.stat_label.setGeometry(self.stat_label_margin, self.stat_label_margin,
                                    self.window_min_size[0] - self.stat_label_margin * 2,
                                    self.window_min_size[0] - self.stat_label_margin * 2)
        font = self.stat_label.font()
        font.setPointSize(10)

        self.setMouseTracking(True)

        self.show()

    def resizeEvent(self, event):
        self.wnd_fit_size = min(self.width(), self.height())

        self.circle_diameter = int(self.wnd_fit_size * (1 - self.circle_margin_ratio * 2))
        self.stick_diameter = int(self.circle_diameter * self.stick_diameter_ratio)

    def _draw_outer_circle(self, painter):
        painter.setPen(QPen(Qt.black, 2, Qt.SolidLine))

        circle_margin = int(self.wnd_fit_size * self.circle_margin_ratio)
        painter.drawEllipse(circle_margin, circle_margin,
                            self.circle_diameter, self.circle_diameter)

    def _draw_sub_lines(self, painter):
        painter.setRenderHint(QPainter.Antialiasing)
        painter.setPen(QPen(Qt.lightGray, 1, Qt.DashLine))

        num_sub_line = 6
        for i in range(num_sub_line):
            theta = math.pi / 2 - math.pi * i / num_sub_line
            x0 = int(self.wnd_fit_size / 2 - self.circle_diameter / 2 * math.cos(theta))
            y0 = int(self.wnd_fit_size / 2 - self.circle_diameter / 2 * math.sin(theta))
            x1 = int(self.wnd_fit_size / 2 - self.circle_diameter / 2 * math.cos(theta + math.pi))
            y1 = int(self.wnd_fit_size / 2 - self.circle_diameter / 2 * math.sin(theta + math.pi))
            painter.drawLine(x0, y0, x1, y1)

    def _draw_sub_circles(self, painter):
        painter.setPen(QPen(Qt.lightGray, 1, Qt.DashLine))

        num_sub_circle = 4
        for i in range(num_sub_circle):
            sub_radius = int(self.circle_diameter / 2 * (i + 1) / (num_sub_circle + 1))
            sub_margin = int(self.wnd_fit_size / 2 - sub_radius)
            painter.drawEllipse(sub_margin, sub_margin, sub_radius * 2, sub_radius * 2)

        # Draw Inner(Joystick) Circle
        painter.setBrush(QBrush(Qt.black, Qt.SolidPattern))
        stick_margin = [int(self.wnd_fit_size / 2 + self.stick_pos[0] - self.stick_diameter / 2),
                        int(self.wnd_fit_size / 2 - self.stick_pos[1] - self.stick_diameter / 2)]
        painter.drawEllipse(stick_margin[0], stick_margin[1], self.stick_diameter, self.stick_diameter)

    def paintEvent(self, event):
        painter = QPainter(self)

        # Draw Outer(Main) Circle
        self._draw_outer_circle(painter)

        # Draw Sub Lines
        self._draw_sub_lines(painter)

        # Draw Sub Circles
        self._draw_sub_circles(painter)

        # Change Status Label Text (Angle In Degree)
        strength = self.get_strength()
        angle = self.get_angle(in_deg=True)
        if angle < 0:
            angle += 360
        self.stat_label.setText('Strength : {:.2f} \nDirection : {:.2f}°'.format(strength, angle))

    def mouseMoveEvent(self, event):
        # Move Stick Only When Mouse Left Button Pressed
        if self.is_mouse_down is False:
            return

        # Window Coordinate To Cartesian Coordinate
        pos = event.pos()
        stick_pos_buf = [pos.x() - self.wnd_fit_size / 2, self.wnd_fit_size / 2 - pos.y()]

        # If Cursor Is Not In Available Range, Correct It
        if self._get_strength(stick_pos_buf) > 1.0:
            theta = math.atan2(stick_pos_buf[1], stick_pos_buf[0])
            radius = (self.circle_diameter - self.stick_diameter) / 2
            stick_pos_buf[0] = radius * math.cos(theta)
            stick_pos_buf[1] = radius * math.sin(theta)

        self.stick_pos = stick_pos_buf
        self.repaint()

    def mousePressEvent(self, event):
        if event.button() == Qt.LeftButton:
            self.is_mouse_down = True

    def mouseReleaseEvent(self, event):
        if event.button() == Qt.LeftButton:
            self.is_mouse_down = False
            self.stick_pos = [0, 0]
            self.repaint()

    # Get Strength With Argument
    def _get_strength(self, stick_pos):
        max_distance = (self.circle_diameter - self.stick_diameter) / 2
        distance = math.sqrt(stick_pos[0] * stick_pos[0] + stick_pos[1] * stick_pos[1])

        return distance / max_distance

    # Get Strength With Current Stick Position
    def get_strength(self):
        max_distance = (self.circle_diameter - self.stick_diameter) / 2
        distance = math.sqrt(self.stick_pos[0] * self.stick_pos[0] + self.stick_pos[1] * self.stick_pos[1])

        return distance / max_distance

    def get_angle(self, in_deg=False):
        angle = math.atan2(self.stick_pos[1], self.stick_pos[0])
        if in_deg is True:
            angle = angle * 180 / math.pi

        return angle
Joystick_Test.py
조이스틱 클래스를 테스트하기 위한 코드이다. 조이스틱 window의 freezing을 방지하기 위해 QThread를 사용한다. 파이썬의 기본 threading 라이브러리를 사용하면 안 된다.
import sys
import time

from PyQt5.QtWidgets import QApplication
from PyQt5.QtCore import QThread

from Joystick import Joystick


class Thread(QThread):
    def __init__(self, parent):
        super().__init__(parent)
        self.parent = parent

    def run(self):
        for i in range(100):
            time.sleep(0.5)
            strength = joystick.get_strength()
            angle = joystick.get_angle(in_deg=True)
            print('Strength : {:.2f} | Angle : {:.2f}°'.format(strength, angle))


app = QApplication(sys.argv)
joystick = Joystick.Joystick()

th = Thread(joystick)
th.start()

sys.exit(app.exec_())
반응형
'컴퓨터공학 > 예제 코드' 카테고리의 다른 글
| [예제 코드] openpyxl 기초 사용법 완벽 정리 (0) | 2023.10.23 |
|---|---|
| [예제 코드] hyperopt를 사용한 LightGBM의 hyperparameter tuning (0) | 2022.10.05 |
| [예제 코드] 분류 모델에 사용되는 성능 평가 지표 (sklearn 사용) (0) | 2022.07.21 |
| [예제 코드/Python] 바이낸스 API를 이용한 암호화폐 선물 가격 데이터 얻기 (0) | 2022.06.11 |
| [예제 코드/C언어] 윈도우 명령 프롬프트 크기 변경&고정하기 (0) | 2022.06.11 |
'컴퓨터공학/예제 코드' Related Articles
more

Comments